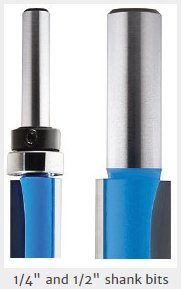
 ❈ Making Clean Cuts w/ Router Bits... 10 Tips for Woodworkers(1) If possible, use router bits with 1/2" shanks. Many routers come with interchangeable 1/4" and 1/2" collets, and many bits are available in both shank diameters. But you're likely to get better stability and less vibration with 1/2" bits because of the increased shank mass - and that typically yields a smoother cut and longer cutter life. | ||
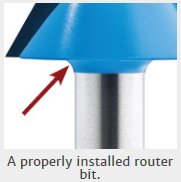 (2) Make sure that the bit is properly installed in the router. Insert it until it bottoms out, then back it out about 1/16" to 1/8" and tighten the collet. If you don't back it out, the collet might tighten at the rounded transition area between the cutter and the shank - meaning that it won't be in full contact with the rest of the shank. This increases the risk that the bit could come loose while the router is running - a very dangerous scenario. (2) Make sure that the bit is properly installed in the router. Insert it until it bottoms out, then back it out about 1/16" to 1/8" and tighten the collet. If you don't back it out, the collet might tighten at the rounded transition area between the cutter and the shank - meaning that it won't be in full contact with the rest of the shank. This increases the risk that the bit could come loose while the router is running - a very dangerous scenario. | ||
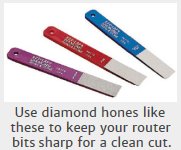 (3) Make sure that your bits are sharp, smooth and clean. Resin buildup and dull cutters lead to heat buildup, which will further dull the bit and produce a bad cut. Buildup can be removed with a product such as Rockler's Pitch & Resin Remover (Item #39146), and bits can be given a touch-up
sharpening with diamond-coated sharpeners (Item #24663, for example). (3) Make sure that your bits are sharp, smooth and clean. Resin buildup and dull cutters lead to heat buildup, which will further dull the bit and produce a bad cut. Buildup can be removed with a product such as Rockler's Pitch & Resin Remover (Item #39146), and bits can be given a touch-up
sharpening with diamond-coated sharpeners (Item #24663, for example). Also check for nicks in the bits' cutting edges. It might be possible to remove small nicks with diamond sharpeners, but cutters with large nicks are best reground by a professional. For bits with guide bearings, make sure that the bearings can spin freely. If necessary, clean and lubricate with a product such as the PG2000 RouterBit Bearing Lube Pen (Item #31801). | ||
 (4) Watch your bit speed. Not all router bits can be run at the same speed. Larger router bits have more mass and therefore the potential to create greater vibration at high speeds. (4) Watch your bit speed. Not all router bits can be run at the same speed. Larger router bits have more mass and therefore the potential to create greater vibration at high speeds. So, as illustrated in the chart on the right, the general rule is: the larger the bit's diameter, the slower the speed. Manufacturers often specify maximum speeds for their router bits, and you should follow those recommendations. Even so, it's important to remember that these are the top speeds for safe operation and are not necessarily the best speeds for every situation. Other factors include router horsepower (a less powerful router will slow down when it's driving a large bit through a cut), feed rate, quality and condition of the bit and the machining properties of the wood being used. | ||
 (5) Clear the chips. Connect your router or table to a shop vac or dust-collection system to remove the waste material. (5) Clear the chips. Connect your router or table to a shop vac or dust-collection system to remove the waste material. If chips accumulate between the router plate and the workpiece (in handheld routing) or between the fence and the workpiece (in table-mounted routing), the cut will suffer. | ||
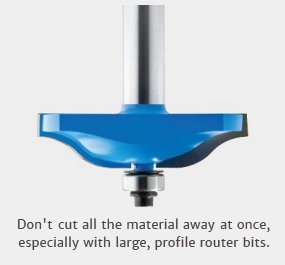
| (6) Make multiple light passes rather than one heavy cut. This is particularly important when working with bit profiles that remove a lot of material, but it also applies when routing dadoes or rabbets with a straight bit. Routers and bits aren't made to hog out all the material at once, and you'll get tearout and burning if you try. (The increased load also will dull bits quicker and perhaps even shorten the life of the router.) Instead, make two or three passes, increasing the depth of cut slightly each time. This can be especially beneficial when working with woods that tend to burn easily, such as cherry, or figured woods prone to tear-out. And if you're using a flushtrim bit to rout a pattern or trim an edge, remove as much material as possible with a jigsaw or bandsaw first to decrease the burden on the bit. | ||
| (7) Mind your feed rate. The feed rate is the speed at which the rotating bit is moved along the edge of the material (in handheld routing) or the edge of the material is moved across the rotating bit (in table routing). If you feed too fast, the bit will bog down, resulting in a rough cut. If you feed too slowly, you'll wind up with burnishing or burn marks on the edges. Make practice cuts until you're able to produce a smooth, consistent feed rate. This is especially important when working with long stock because of the need for hand-over-hand feeding. And try to keep the stock moving: Stops will cause burning. | ||
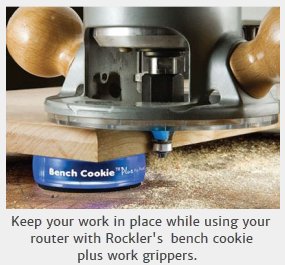
| (8) If using a handheld router, make sure that the workpiece won't shift during the cutting operation and that there's proper clearance for the bit. Rockler's Bench Cookie® Plus work grippers (Item #46902) make this simple and easy (without clamps), and optional risers (Item #35142) can be added if even more clearance is needed.
If using a table-mounted router, make sure that the fence is set properly and that the work surface allows for a consistent feed rate. Also, use featherboards (Item #64662 for the table and #53685 for the fence) to make sure the stock remains tight against the fence and the table as it is passed across the bit. | ||
(9) Route in the right direction. In a handheld router, the bit spins clockwise with a great deal of speed and force. For maximum safety and control, move the router in a counter-clockwise direction when routing the outside edges of your stock. If you're routing the inside edges of a frame, move the router in a clockwise direction. That way, the rotation of the bit helps keep it against the stock.
| ||
| (10) When cutting a profile on all edges of a board, rout in the right order. Rout the end-grain edges first and then the long-grain edges. As the bit approaches a corner in end-grain routing, some of the wood typically splinters off. If the ends are shaped first, these areas of tear-out will be removed when the long-grain edges are routed. When cutting a profile only on the end-grain edge, or when shaping the ends of a rail in stile-and-rail constructions, add a backer board to the workpiece to eliminate tear-out. |
 |
 |